Google Tag Manager + Google Analytics + Facebook
On this page you will find the method to connect AppConsent CMP with the Tag Management System Google Tag Manager. In a second step, you will see how to integrate a third-party provider such as Facebook.
caution
Before proceeding, we assume that you have a valid installation of GTM on your site.
If you are new with GTM please find the official Google documentation here.
1. Implement AppConsent via Google Tag Manager
We assume that your Google Tag Manager installation is ready and functional.
1.1. Step by Step implementation guide
Since July 2021 it is possible to run AppConsent using only Google Tag Manager.
1.2. Install tags templates
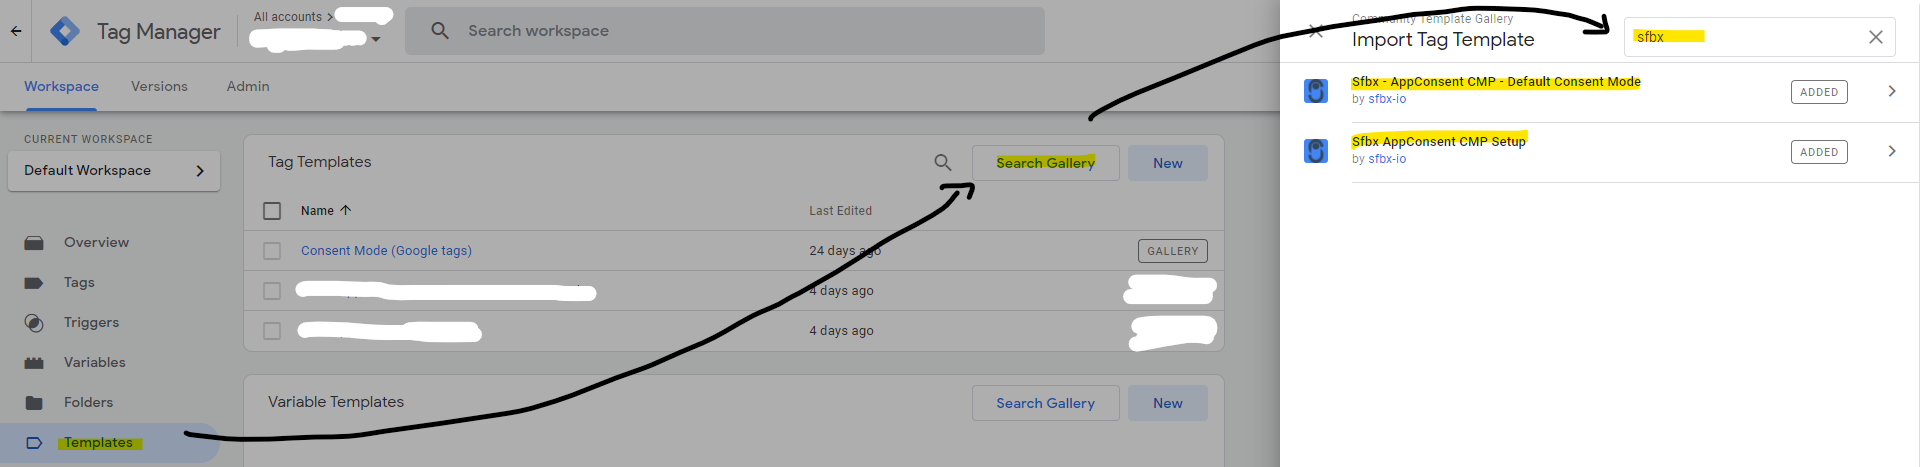
From your Google Tag Manager account, go on your container > On the left panel click on Templates" > Click on Search Gallery" > In the search bar, write sfbx" > Find the Tags Templates who are called Sfbx App Consent CMP Setup" and Sfbx - AppConsent CMP - Default Consent Mode"* > Add them on your container.
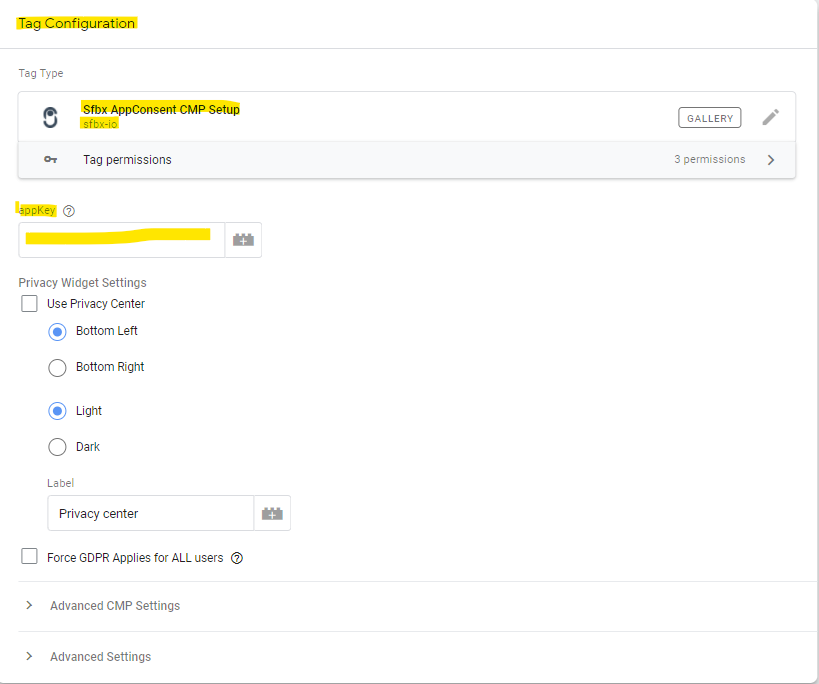
1.3. Configure the tag template "Sfbx App Consent CMP Setup"
This tag template allows you to use our Consent Management Platform without the pieces of Javascript code mentioned here.
On the left panel click on Tags > Click on New > Rename it as you want.
Click on Tag Configuration > You must fill the field Appkey from your notice > Save your changes and do not care about the fact that you do not added a trigger: we will see that in a minute ;)
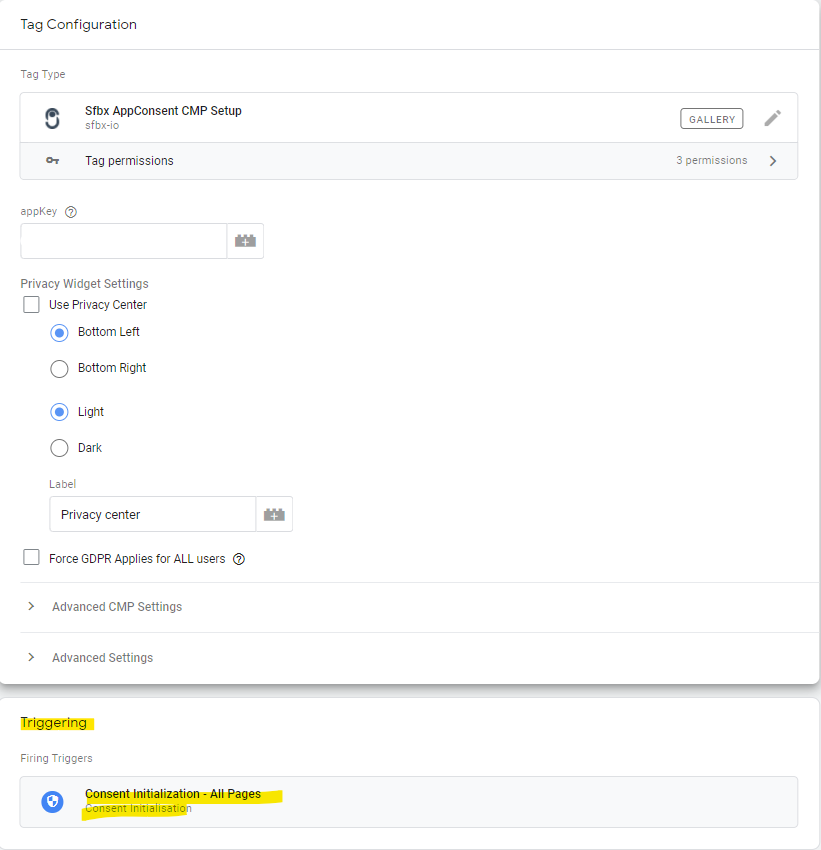
Reopen the tag you just created > Click on Triggering > Choose Consent Initialization - All Pages > Save your changes.
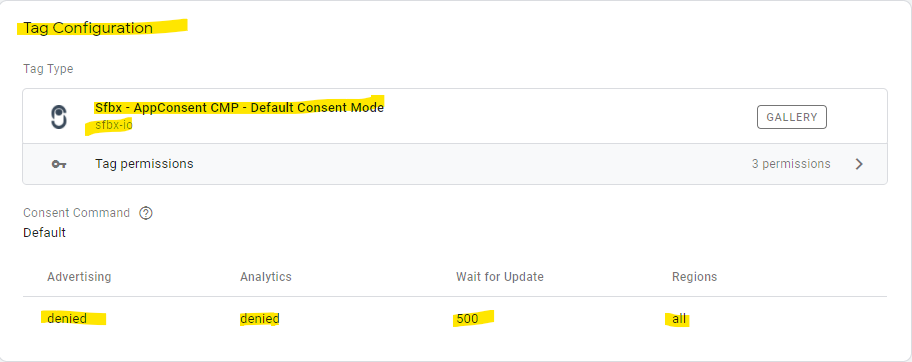
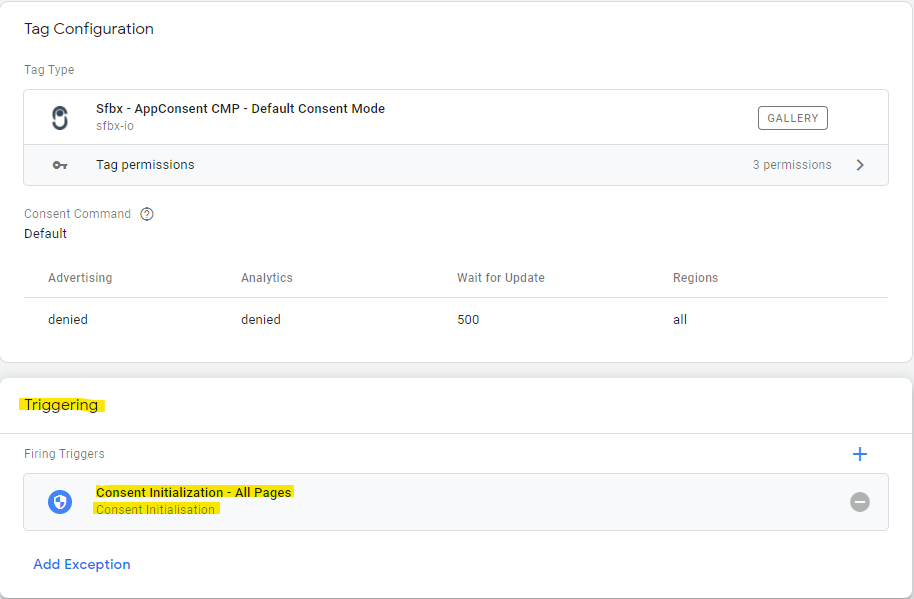
1.4. Configure the tag template "Sfbx - AppConsent CMP - Default Consent Mode"
This tag template allows you to use Google Consent Mode by Google Tag Manager.
On the left panel click on Tags > Click on New > Rename it as you want.
Click on Tag Configuration > In the section Custom, choose Consent Mode (Google tags) > Then, in the table called Default Consent Settings, click on Add Setting > A right popup appears with some parameters which are already filled > Do not change them and click on the button Add > Save your changes and do not care about the fact that you do not added a trigger: we will see that in a minute ;)
Reopen the tag you just created > Click on Triggering > Choose Consent Initialization - All Pages > Save your changes.
2. Manage Google Analytics via Google Tag Manager
2.1. Step by step implementation
We will use the free version of Google Tag Manager to show you how to integrate the CMP into your Tag Management System.
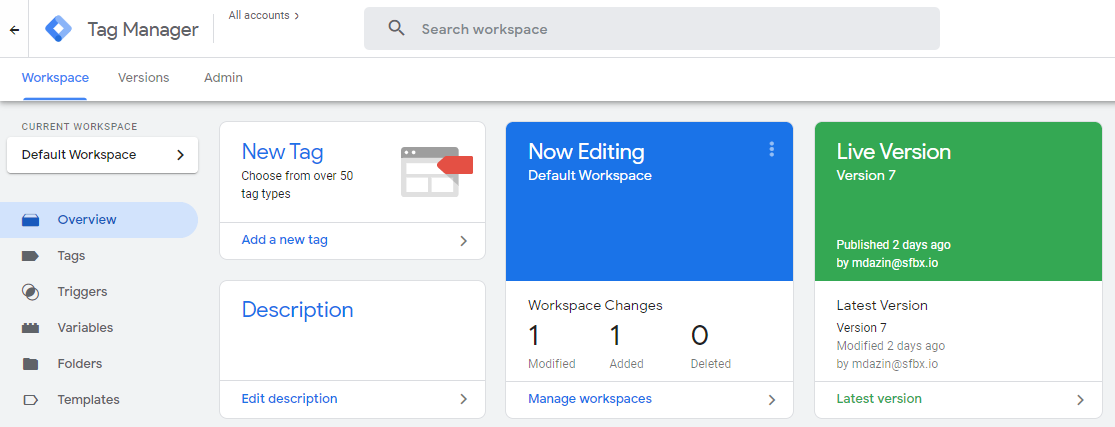
2.2. Go to Google Tag Manager
Go to https://tagmanager.google.com/#/home and choose the container for your website.
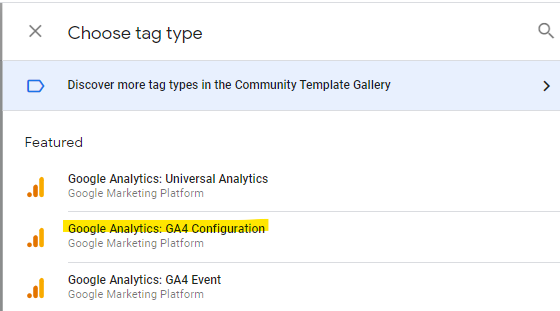
2.3. Add Google Analytics
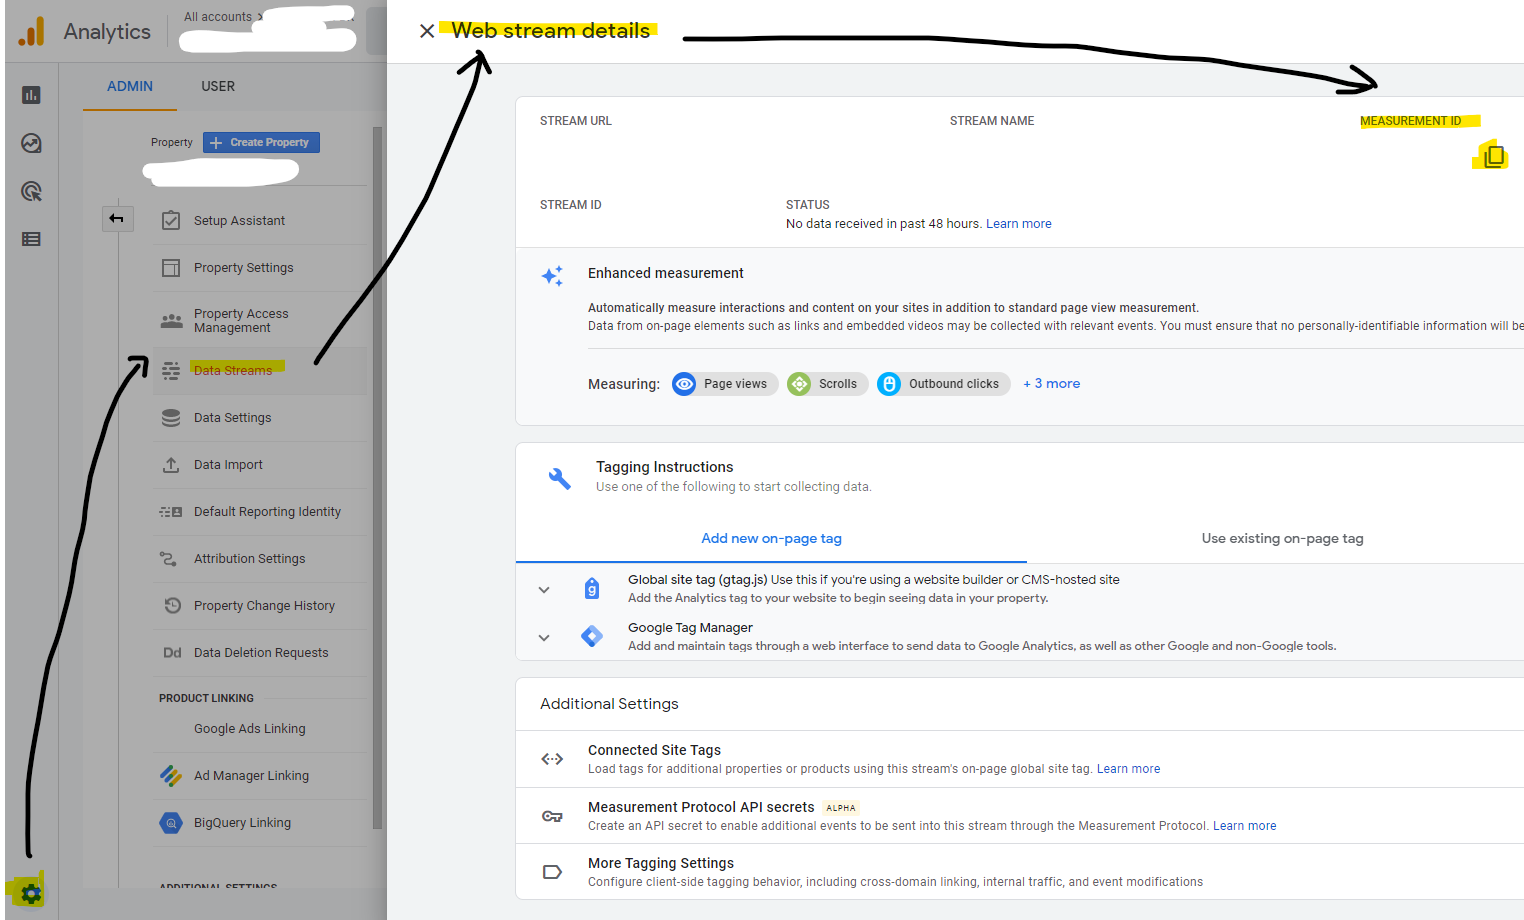
How do I find my Measurement ID?
You can find your Measurement ID from Google Analytics. Here is the path to it: Administration > Property > Datafeed > Select the Data Stream and click on it > A new window will open with the measure ID at the top left.
We will create the link between the user's choices and Google Analytics.
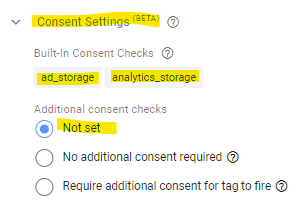
Go back to Tags and add a new one of type Google Analytics GA4 Configuration while renaming it as you like > Fill in the Measurement ID that comes from your Google Analytics account > Click on Permission settings > You can see that your tag is already ready to use the ad_storage and analytics_storage signals that will be sent by our AppConsent CMP > Click on Save.
note
At this point, your CMP must be running and Google Analytics must be controlled by Google Consent Mode (= Google Analytics will only send cookies with users' consent).
3. Adding and control extra vendor (or any other tag)
3.1. Facebook Pixel
3.1.1. Method via "acextravendor_granted_id" event
We assume that you have already created a non-IAB partner in your BO called Facebook and that you have linked it to your notice.
You need to retrieve the ID of this non-IAB partner from your AppConsent BO (in our case "q7g16FZM").
![]()
In the left-hand menu, click on Triggers > Click on the New button > Rename the trigger to acextravendor_granted_id (in our example acextravendor_granted_q7g16FZM) or any other name you like > Click on Trigger configuration to start the configuration and choose Custom event > Click on Custom event in the list on the right and fill in the field as follows:
![]()
Click on Save.
caution
acextravendor_granted_id (in our example acextravendor_granted_q7g16FZM) must be filled in exactly like this. You can rename the title (in the upper left corner) but never the value in the Event name field. Otherwise, you will lose the link with the tag will not be done.
We will now proceed to the last step: linking the Trigger with a Tag.
In the left menu, click on Tags > Click on the New button > Rename the tag to Facebook Pixel or whatever you want > In Tag configuration, choose Custom HTML > Copy and paste the code of the Facebook Pixel you found on your Facebook BO > In "Trigger", select the acextravendor_granted_id trigger you created earlier (in our example acextravendor_granted_q7g16FZM) > Your tag should look like this example:
![]()
Click on Save.
That's it: the consent of this non-IAB Facebook partner is now linked to the CMP! Facebook will only take information if the user has accepted the CMP.
3.1.2. Method via the purposes of processing
info
You can also if you wish, use the events related to the purposes of processing instead of the partners. This can be useful for example to control the triggering of your own internal processing (personalized content, AB Testing, etc...).
To control partners that are not registered with the IAB and are not part of Google, we will use custom triggers and events.
AppConsent's CMP automatically triggers 10 events according to the 10 available purposes.
Let's start by adding a custom event.
In the left menu, click on Triggers > Click on the New button > Rename the trigger to appconsent_ctrl_1 or any other name you like > Click on Trigger Configuration to start the configuration and choose Custom Event > Click on Custom Event in the list on the right and fill in the field like this:
![]()
Click on Save.
caution
appconsent_ctrl_1 must be filled exactly like this. You can rename the title (on the top left corner) but never the value in the field Event name. Otherwise, you will lose control of the tags.
According to your needs, do the same thing for appconsent_ctrl_2, appconsent_ctrl_3... appconsent_ctrl_10.
info
For the records, here is the list of purposes according to the IAB Framework:
List of purposes:
1 - Store and/or access information
2 - Select basic ads
3 - Create a personalized ads profile
4 - Select personalized ads
5 - Create a personalized content profile
6 - Select personalized content
7 - Measure ad performance
8 - Measure content performance
9 - Apply market research to generate audience insights
10 - Develop and improve products
Now it's time to link the events fired by the CMP to your tags.
Go to your Google Tag Manager home page again and choose a tag that you want to control according the purpose events. Let's try with a Facebook pixel.
Typically, advertising tags are triggered on all page views.
In the left menu, click on Tags, then on the New button > Choose a tag type and pick Custom HTML (or a template that match the partner you are currently integrating) > In the HTML part, copy/paste the code of your Facebook pixel tag > Click on the "Triggering" panel and choose the right custom event (in our case, appconsent_ctrl_1)
info
appconsent_ctrl_1 is linked to purpose 1, Store and/or access information on the device. That means that we will only trigger the Facebook tag if the user agrees to cookies.
![]()
Click on Save.
Repeat the operation for all tags that you want to control with the CMP.
caution
At this point: do not forget to publish the new version of your container ("Publish and create a version")
That's it, the CMP is ready and you can control Google Tag Manager and Google Analytics tags as well as non-IAB partners.